Archive for the 'DOS' category
There are two ways to display graphics in DOS. The first involves getting out of text mode and setting the desired graphics mode and then drawing pixels on the screen via the BIOS or writing directly to video memory; the second method involves drawing with the set of ASCII or extended ASCII characters. You can also make use of ANSI escape sequences to control the cursor, display coloured or blinking text, etc. DOS requires an ANSI driver in order to translate these escape sequences. These character codes are non-intuitive and look something like this: ESC[=5;7h. I swear my cat coughed up a fur ball which looked exactly like that the other day.
The set of extended ASCII characters provides an easy way to draw connected lines within the grid of displayable characters. This grid changes in size depending on the video mode set. With the default video mode in DOS, the dimensions of this grid is usually 80 characters wide by 25 characters high and covers the entire screen. Naturally, these characters can be connected to form anything from boxes to mazes. It’s how all those menus and dialogs are drawn when using a program like QBasic.
TheDRAW is a program which allows you to paint a picture using a variety of special characters. It’s not like painting individual pixels, you are limited by the set of characters available. However, this hasn’t stopped ASCII artists from creating fantastic content. The most stunning examples I found were on Bulletin Board Systems which used them to attract new and repeat visitors alike. The ANSI art found on those systems were often themed according to design of the on-line system or the whim of the system operator. Using TheDRAW, these pictures could be exported as ANSI-compliant or ASCII text files, or as header files to be used in other programming languages. There are a number of small tools available for translating these files into other formats used by other programming languages.
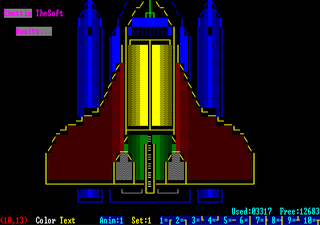
Many of my programs in QuickBasic took on a more professional and uniform look because of this spectacular drawing tool. I still find it the best tool available for doing this sort of work in DOS, although I’m sure many of you may prefer other programs.
When I began to write software using The C Programming Language, I used TheDRAW to create a title screen in a number of small programs (the concept of a splash screen hadn’t been introduced yet). Although most dialogs and windows I used were crafted in code using a custom built user interface library, the more complex dialogs were created using this application. To allow for input or interaction, the fields were marked by a special character, followed by a small series of alpha-numeric characters. These markers would be found by the interface library and the characters following the marker would correspond to a header file which linked the “names” to constants and then to user interface controls and data structures.
The output from TheDRAW was compressed and archived in a separate resource file to keep them from being easily pillaged by unworthy scavengers. I’m not an artist so it may have been overkill.
Categories: DOS, Software
1 Comment »
 Despite Tandy’s DeskMate application which tried to handle a number of disk and application related functions, MS-DOS (Microsoft Disk Operating System) was the actual operating system on which Deskmate needed to operate. I had experience with an earlier version of Microsoft’s DOS which I used at school; I believe the versions were 2.0 and 1.25. Unlike today where hard drives are common place and often taken for granted, the machines in the lab could only boot by way of 5 1/4″ floppy diskettes which contained the operating system. I believe the Tandy computer came with MS-DOS 3.42 and it was pre-installed on the hard drive. This was so much better than booting from a floppy, and I quickly assimilated as many commands as I could, since the school never gave me the time I wanted on the machine or the resources. Even with the aid of a text book, there were a few commands which took me a while to grasp, like COMMAND.COM or DEBUG.COM. My understanding of these wouldn’t completely solidify until I started programming in lower level languages like C and assembly language. I was also introduced to Microsoft’s shell scripts which they called Batch files. With the addition of extra software on the system, these scripts could actually become fairly sophisticated. Before I moved on to greener pastures and more flexible user interfaces, my system had sophisticated menus and launchers which helped my family out when they wanted to use the machine (it wasn’t often, but it did happen). Despite Tandy’s DeskMate application which tried to handle a number of disk and application related functions, MS-DOS (Microsoft Disk Operating System) was the actual operating system on which Deskmate needed to operate. I had experience with an earlier version of Microsoft’s DOS which I used at school; I believe the versions were 2.0 and 1.25. Unlike today where hard drives are common place and often taken for granted, the machines in the lab could only boot by way of 5 1/4″ floppy diskettes which contained the operating system. I believe the Tandy computer came with MS-DOS 3.42 and it was pre-installed on the hard drive. This was so much better than booting from a floppy, and I quickly assimilated as many commands as I could, since the school never gave me the time I wanted on the machine or the resources. Even with the aid of a text book, there were a few commands which took me a while to grasp, like COMMAND.COM or DEBUG.COM. My understanding of these wouldn’t completely solidify until I started programming in lower level languages like C and assembly language. I was also introduced to Microsoft’s shell scripts which they called Batch files. With the addition of extra software on the system, these scripts could actually become fairly sophisticated. Before I moved on to greener pastures and more flexible user interfaces, my system had sophisticated menus and launchers which helped my family out when they wanted to use the machine (it wasn’t often, but it did happen).
Version 5 was a much more refined operating system and contained powerful commands and programs like QBasic. It also featured a memory manager which allowed software to access all of that wonderful new memory that you may have been fortunate enough to acquire. Although it was included in MS-DOS Version 4, I believe the DOSSHELL command’s popularity spiked in Version 5. This was a program which was intended as a graphical replacement to the dull COMMAND.COM shell. It introduced a feature called task swapping which allowed you to load more than one program but only run one of them at a time; unlike multitasking which appears to run more than one program at the same time. Also, DOSSHELL could not load more programs than your memory would allow since it did not have a paging mechanism. Naturally, all of these benefits conflicted with the new versions of Windows which did exactly the same thing only better, and was soon relegated to a supplemental disk in future releases before being dropped entirely.
Version 6 introduced the much feared DELTREE command. DELTREE was a command which could recursively remove directories and files; it was so feared because new or untrained users would presumably delete their entire operating system accidently. If this was indeed a problem, I think they should have modified the program to make it more difficult to accidently trash your operating system by adding extra prompts and warnings for example, since it is a very useful command in some circumstances. Despite its notoriety, it was a fairly simple command as far as software goes, and the void was soon filled by programmers who released new versions on the Internet which did exactly the same thing only better; I wrote a utility to replace it as well but mine displayed a user interface if you specified the right command option.
Categories: DOS, Reflections, Software
No Comments »
After I had finished assembling my RetroBox, I was forced to to make a decision on what operating system to use. I chose to go with Windows 98 because I needed to be able to access my network. I also wanted to be able to boot into a DOS shell, but I didn’t want to dual-boot the machine. By writing a few options into the CONFIG.SYS and AUTOEXEC.BAT files, the user is presented with a small set of choices which may drop them into the shell. When I need to access files on my network or if I want to print something, I choose an option which boots me into Windows. My RetroBox is not a terribly fast beast, and it takes a while to boot and log-in.
To help alleviate this problem, I installed Microsoft LAN Manager in my DOS environment. Now I can access my network files and print through the network with ease. The process was a little frustrating and your experience may vary. I am providing this information, just in case you’re considering tossing the whole project and moving to Tibet to become a monk (if you’re already a monk living in Tibet, then you may be considering moving to Canada to become a Mountie).
The very first step would be to obtain a network card. For compatibility reasons, a popular 10/100 Mb card would be optimal. I have compiled a list of network card drivers which are bundled with Microsoft LAN Manager (which I will now be calling LAN Man to save some typing). Even if your network card is not on the list (mine wasn’t), you may still be able to obtain a driver from the company’s web site. My card is a D-Link “DFE-538TX Rev. D” and the earliest driver posted on the website was for Windows 98. After decompressing the file, however, I found a driver specifically for LAN Man which saved me from having to create a custom NIF file. I will explain how LAN Man uses these files a little later.
Once the physical card is installed, unpack your installation and run SETUP.EXE to get started. For many people, the setup process should be pain-free. My setup was not so problem free, however. I suppose it was due to the fact that I was running the Windows 98 shell, and not a pure MS-DOS, PC-DOS, or FreeDOS installation. I believe the root of the problem stemmed from the fact that the Windows 98 shell doesn’t like the ‘$’ wildcard. If you take a look at the SETUP.INF file, you’ll notice a number of files ending in the dollar sign. Within the file, a program like NetBEUI would be referenced like this:
DRIVERS\PROTOCOL\NETBEUI\NETBEUI.ex$
Under MS-DOS, this would match the file NETBEUI.EX_. Under the Windows 98 shell, it does not seem to match it at all, so the installer complains that it cannot find the file. What I did to correct this problem was to simply change the wildcard to the ‘_’ character and presto! The installer was able to see the file and continue with the installation.
Because my card was not on the list of available drivers, I needed to add it to the list myself, which meant making an entry in the SETUP.INF file so it could find the driver files (<DRIVER NAME>.DOS and PROTOCOL.INI) and the Network Information File (NIF). After making an additional entry in the SETUP.INF file and copying the files to the right locations (under DRIVERS\ETHERNET), the setup program correctly enumerated the card name and I was able to select it from the installation menu.
After these changes, the install carried on happily, but complained at the very end that it could not find the “NETWKSTA.” file. There is no “NETWKSTA” file; it’s just a directory. This is the eight-character directory shorthand for Network Work Station. I don’t know why it was complaining, but it’s an important program and needs to be installed so you can use network resources like shared files and printers. This is also easily corrected after completing the installation. Just copy the file:
\MSLANMAN.DOS\NETWKSTA\NETWKSTA.500 to
\MSLANMAN.DOS\NETPROG\NETWKSTA.EXE.
Don’t copy it from the CD-ROM, because that file is compressed and won’t run. That file will end in an underscore, so it won’t match the name I listed above.
During the network setup portion of the installer, if you choose to use DHCP then you don’t need to specify an IP address or sub-net mask. For log-in credentials, just supply a user name without a password if you don’t have an MS LAN Manager or Windows NT authentication service setup. When it asks you for a domain name and you don’t know what that means, just enter in a dummy name or leave it blank (I didn’t try leaving it blank, the installer may refuse to continue). One item to keep in mind: a Windows domain is not the same thing as a work-group, but I used my work-group name anyway since I knew it wouldn’t matter. Eventually, if I choose to setup a domain, I will change the domain name at that time.
After moving the commands inserted into my CONFIG.SYS and AUTOEXEC.BAT files around to suit my own taste, I rebooted the machine and ran the NET.EXE program. Using this software, I could enter the UNC path to one of my machines:
\\MACHINE1
Go to the view menu and select “View available network resources”. It will present you with a dialog which will allow you to assign a shared folder to a local resource like a drive letter. I was able to read and write (provided the permissions are set appropriately on the share) to the folder using the new drive letter (F: in this case).
Please note: you won’t be able to mount a printer or a shared folder if the share name is greater than eight characters! It will simply complain that it cannot find the network resource.
Categories: DOS, Software
No Comments »
The story behind the source code release goes something like this: In December of 1997, id Software released the source code for Doom to much fan fare and adulation. After only a few short weeks, web sites starting popping up and modified (or modded) versions started appear on bulletin board systems. Before the source code was even released, their were already tools available for modifying the existing graphics and levels, or for creating your own levels, on the Internet. These tools operated on the storage format for the game’s resources, which included maps, graphics, sound effects, etc. These resource files were called .WAD or .IWAD files. WAD does not stand for anything in particular, but you could choose to think of it like a wad of gum after eating a burrito. It contains all sort of unrelated bits in it, like green pepper and cheese, but together they form a chewy and cohesive whole. Yummy.
Modification to the actual game engine allows for much greater control over how the game operates. Despite this new found ability, many programmers or modders chose to leave the original code base intact, in order to give their users the freedom to play the older levels designed by the master’s at id Software. I believe this should be an important creed for any aspiring Doom hacker to follow, as it will allow your audience to experience the many thousands of levels available for immediate download. Just in case your levels fail to impress your core audience, such as Mother.
This project is intended to document what you need in order to build the DOSDoom (another port of Doom) source code on your machine. We chose to use DOSDoom, instead of the original code base, because the original requires a fair amount of modification to get it building with the available development tools and environments on an MS-DOS compatible machine. This brings me to my next point, you’re going to need a compatible DOS operating system installed somewhere in your house, if you want to compile this project; Windows 95 actually works quite well too as they are basically one and the same in many respects. As a trusty member of the classic gaming community, I trust this shouldn’t be a problem for those of you who are still reading.
DOSDoom brings a nice set of options to your exisiting Doom game. Features like mouse support, the “look” feature, CD audio, alpha blending, custom resolutions, and a whole lot more! Trust me, when you’re finished setting it up, you’ll think it’s almost like a new game.
Ok, first things first, you’re going to need the source code. It also helps to have a pre-built copy of DOSDoom on hand for comparison, and a chance to try it out just for fun. Personally, I love this version of Doom and will typically opt to play it over the original; unless we’re talking about the Playstation port, then we could be persuaded switch platforms for a while, or the Mac OS X port I wrote about a while ago. Of course, before either version will work, you need an original version of Doom. Please respect copyright laws and get yourself a legal copy; it’s not that expensive when you consider what you’re getting in return. Now would be a good time to unzip the pre-built copy of DOSDoom into your Doom game directory.
For those of you who weren’t born with a debugger in your bonnet, there’s a few pieces you need to have in place before you start unpacking the source code for DOSDoom. First, you need to understand the process by which program code gets transformed into something you can actually use. However, we’re not going to write yet another treatise on “How To Program In Such And Such A Language,” although for your reference, the core programming technologies used in this project are called C and Assembly Language. Learning to become a programmer is an iteresting but terribly long ordeal. I don’t recommend it unless you’re planning on making it a serious hobby or even a profession. Choose to play the game instead, you’ll probably be happier.
Since you’re still reading this article, I think it’s fair to assume that you’re mildly interested in the topics presented thus far, so let’s get a few terms under our belt before we begin. There is one general phase which must take place before you can use the source code provided and that phase is called compilation. A compiler is a tool used for translating source code which has been written in a high-level language, such as the C programming language, into a lower-level language more suitable for native execution within the hardware environment you are using. From a software development perspective, writing a good compiler is one of the most difficult and rewarding experiences a programmer could choose to undertake. However, simply using a compiler is usually no more difficult than learning any other moderately complex tool. Yes, there are usually a plethora of options and fancy doodads available for any aspiring geek, but many of them are rarely used and can be ignored most of the time. The compiler used for this project is part of a free development environment called DJGPP. DJGPP was primarily constructed by a man named DJ Delorie with plenty of help from the open source community. It contains numerous utilities, including a DOS port of the GNU GCC Compiler Collection.
Assembly Language, on the other hand, is much less abstract and tends to be a lot closer to a machine’s level of understanding. This source code does not need to be rigorously compiled and students of computer science will often write simple assemblers for course projects. Instead, Assembly is translated into machine language almost directly. Depending on the software used, “almost” can vary from assembler to assembler. DOSDoom’s source code contains only a couple of assembly language modules and can safely be ignored unless you’re planning on making low-level modifications to the game’s rendering engine. For this project, we’ll be using GCC’s assembler called GAS for all of our assembly needs. There is one item we wanted to mention when using GAS assembly code: it does not follow Intel’s coding conventions for instruction mnemonics, it uses the AT&T style instead. For a great book on coding for the Linux platform (which typically uses GCC as the default compiler/assembler toolkit), pick up a copy of Professional Assembly Language by Richard Blum (ISBN: 0-7645-7901-0).
Now that we’re all a little familiar with the basic process, here is the complete list of packages needed in order to compile DOSDoom:
Now what are these extra packages all about anyway, eh? They’re all required too, except for RHIDE which is a nifty Integrated Development Environment (IDE) very much like Borland’s early C/C++ IDE, and the DJ File Packer which is used to shrink the size of the resulting executable into something more manageable. The DPMI server is required by every 32-bit protected-mode application (in this case it’s DOSDoom) for DOS and gets launched automatically by the client application – just make sure it’s available via the PATH environment variable or in the applications home directory. The item listed only as Make is a set of tools used to easily build applications by managing their dependencies; although the syntax used to create Make files is anything but intuitive. Last, but certainly not least is the Allegro Game Library originally written by Shawn Hargreaves. Allegro is used to fill some of the gaps left by id Software when they released the source code for Doom. It’s a great library and can save you loads of time when you’re trying to write an application. All of these tools or libraries are relatively complex and deserve your attention if you want to make any useful contributions to this code base.
All but the last package, CSDPMI, must be unzipped into the same directory; CSDPMI goes into the Doom game directory instead. To help illustrate where everything goes, here’s a look at our build directory:
contrib

allegro

bin

doc

gnu

include

info

lib

man

manifest

projects

share

tmp
Once the packages have been decompressed, modify the DJGPP.BAT file to suit your own directory organization. For example, my batch file looks like this:
@echo off

set PATH=c:\source\dosdoom\djgpp\bin;%PATH%

set DJGPP=c:\source\dosdoom\djgpp\djgpp.env
Execute the batch file whenever you open a new console window (when using Windows 95), or after you’ve booted into DOS. Now, open the file under the Allegro directory and find a file named makefile. Remove the bit of text “-Werror” from the file using your favourite text editor. This is a compiler option which will halt the compilation process when a compiler warning is encountered; normally, it’s not a bad idea, but for the sake of simplicity we’ll remove it for now. The next step is to build the Allegro library by typing the command make.
Depending on the speed of your machine, the compilation process may take a while and you’ll see several messages displayed on screen. If you downloaded everything from this web site, you should experience no errors (provided you removed the compiler option mentioned above); although a few compiler warnings will make their appearance now and then. Once the Allegro library has been built, you should now enter your DOSDoom source code directory and type make again. This will build your DOSDoom executable file. You’ll need to copy this file (/obj/dosdoom.exe) into your Doom game folder (where the main executable file doom.exe is found) . Run the file dosdoom.exe and enjoy!
Remember: When making modifications to DOSDoom, please acknowledge all of the contributors who have made DOSDoom into what it is today. Without the tireless efforts from these people, you would have a lot of work on your plate before you even got started implementing your own vision of what you want Doom to be.
Categories: DOS, Programming, Retro
1 Comment »
|


