
Archive for September, 2007
Neverball
September 28, 2007Game Development: Introduction
September 18, 2007SX-Key Programmer and the XGS
September 17, 2007 I tried to use the SX-Key over the weekend to upload binaries and run or debug them via the SX-Key IDE. Unfortunately, there seems to be a timing problem when I run the programs. If I assemble and upload the binary using the XGS ME software, the program works just fine. I’m going to compare the generated files when I get home tonight. Hopefully, I will find a difference between them which could account for the difference in operation; otherwise, if the porgrams are the same, it would imply a defect in the hardware, which is a lot more troublesome to diagnose (at least for me since I am not a hardware engineer).
I posted my problem to the XGS forum and received a few pointers from the designer, André LaMothe. As per his recommendation, I have reseated the oscillators to no avail. I’ll have to keep the coffee pot hot tonight.
Update: I did not realize the SX-Key “Run” command simply assembles, uploads, and sets the clock. You must still switch the XGS into run mode and reset the system. This is different from the “Debug” command which does everything the run command does, but it uses its own clock instead of the clock found on the XGS which allows the program to run without switching the XGS into run mode.
 I first experienced this desktop software while using a Tandy 1000 RL machine which my father decided to go out and buy at the last minute on Christmas Eve, so I wouldn’t be disappointed. It was a nifty little machine with a 20 MB hard drive, built-in audio, 3 1/2-inch drive, and virtually no expansion capabilities what-so-ever. It had one ISA bus; everything else was pretty much hardwired into the system. It did have serial and parallel ports which allowed you to plug-in a MODEM or printer which certainly helped later on. After booting it up, I discovered the manufacturer had installed DeskMate onto a read-only partition on the harddrive. Much to my dismay, they had pre-configured it at the factory. When I needed to reinstall the system sometime later, DeskMate never functioned like it did out of the box. For some reason, and I have yet to figure out, it was about two or three times slower.
When compared against other Windowing environments at the time, such as Windows 2.X or even Windows 3.X, it could hold its own. The major feature missing was network support, but even Microsoft products didn’t support that until Windows 3.11.Until DeskMate walked into my life, I had never experienced a visual desktop before. It was an exciting experience and I wanted to explore every nook and cranny. First and foremost, I wanted to write software for it, so I phoned the number provided by Tandy Corporation in our manual. They said I needed to purchase the software development kit (SDK) and a suitable compiler. At the time, I didn’t know what a compiler was so I thanked the person and went about calling local stores and asking them questions. After a bit of research I discovered that the SDK was expensive and so was the compiler, which according to the sales person was a “program to make other programs.” They were probably brushing me off since I was basically a kid (or a young punk) at the time. I know they were at least a few hundred dollars a piece which put them out of my price range. In the end, I’m happy I didn’t invest the money in the SDK since I have since learned it wasn’t very good. Apparently, many companies had to write much of their own code in order to do anything useful. I would still like to check out the API, so until then, I reserve final judgement.
DeskMate had all sorts of small applications available. It had all of the standard applications like a word processor, simple database, spreadsheet, drawing application, telecommunications software, etc. These applications are extremely simplistic compared to what is available today; although the word processor did have spell checking and even a thesaurus and dictionary (purchased separately), and the database was functional enough to be useful. It even installed a personal diary program, which was very well done. It also came with a variety of useful on-screen tutorials to help you learn the software as you use it. Microsoft Windows didn’t have anything that helpful until Windows 95.
 I was exposed to this piece of software at about the same time I was learning how to send graphical data to our printer. I didn’t really appreciate the complexity of this software until much later. My father was the one who was the real expert, but I also fired it up to help with my homework and to calculate some values I needed for a few of the games I was writing. It was the first time I had ever seen a spread sheet program, even though it appeared on the Apple II a couple of years earlier. Financially, the program was a boon for Apple and almost single-handedly lead to the mass adoption of the system. Financially, I’m not sure how it fared on the Atari since it took the company about a year to port it to other systems, but it’s common to see systems for sale on eBay which are being sold with a few games, miscellaneous pieces of software, and VisiCALC.This spread sheet software introduced me to a world where software can be used for something other than playing games. Although, let’s face it, they’re not as much fun or practical these days. I think I absorbed that idea pretty well for a boy who hadn’t quite entered his teenage years. I started to think about how I could write programs for my father which would help him with his financial chores. I don’t think I produced anything terribly useful, but I did write a few small calculator programs which could do a few interesting calculations involving trigonometry and simple algebra. I hadn’t yet discovered decimal encoding techniques like Binary Coded Decimal (BCD), but I eventually learned that Atari used BCD routines in its library implementation which BASIC used extensively. VisiCALC was able to handle floating point values efficiently because it was written in assembly language and the 6502 processor has floating point instructions available. The programmers used these instructions directly instead of using Atari’s library, which had a very positive impact on performance.
For more information on the development of VisiCALC, there are a couple of sources on the Internet available including one from the creators themselves.
GP2X from Gamepark
September 12, 2007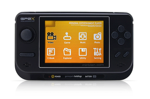 For of all, let me begin by saying the GP2X can be many things to many people. You may wish to use it for watching video using their DivX or MPEG4 player, or listen to music using the installed Ogg or MP3 player software, or even set up a web server using the installed version of Apache. However, I would suspect that most people purchased the device because it’s a cool new tech-toy or because they actually want to play games on it. The extra applications can be useful, but if you really wanted to listen to music on the go, why not get a device that is build specifically for this purpose, like an iPod or a clone? The PSP is also better at playing video, so why not just purchase one of those instead? I also don’t want to forget about the Linux crowd, since this is one of the reasons a co-worker of mine purchased the device, at least officially. He admitted to me later on that he really wanted to play Galaga and Space Invaders, though.
Of real interest to me, however, is the ease in which third-party software can be written for the device. As an example, there are a myriad of hardware emulators available for the GP2X. I’m not going to list all of them here, because you can just as easily visit Wikipedia and read about them. There is probably at least a partially functional emulator for whatever platform you’ve got in mind, and theirin lies the problem. Due to the sheer number of amateur programmers who produce free, semi-functional software, finding a program that actually works well is time consuming. One site which helps alleviate this problem is the GP2X Archive. The site is essentially a repository for Gamepark software which includes available titles for the GP32 platform as well as the GP2X. The repository isn’t what makes the site truly helpful, although having a central location for Gamepark related software does make things easier. It’s the various comments left by users and authors for a large number of projects hosted on the site. Not all of them are useful, and many of the comments could use a pass or two from a spelling/grammer filter, but I’m not complaining.
Before you can begin playing your favourite game, you need to find out which platform the game you have in mind actually runs on. If you don’t know that, then you need to do a bit of research first. I have spoken with people many times and most of them have similar reactions when I tell them about the GP2X: “Cool! Can you fire up Ms. Pac-Man?” The question I ask them in return is usually “Sure. Which one?” They usually look at me with a confused expression and ask “What do you mean?” The problem is they have an image in their mind, a game they had played from a long time ago. They haven’t considered that I don’t know what image they are seeing, since many games from the by-gone era of arcade games often ran on several different hardware platforms. Each of those games, although similar in title, usually played quite differently from one machine to the next. An excellent example of this is Pac-Man, which was a brilliant game on an arcade machine but wasn’t very much fun on the Atari 2600.
Once you have the name of the hardware platform in hand, you should visit the GP2X Archive or use the Google search engine to find an emulator that meets your needs. Many of the emulators available are less than perfect, but there are a few diamonds in the rough. One such emulator is the GnGeo2x for the NeoGeo home entertainment console. It takes a fair amount of tweaking and configuration to get it working just right, and the right machine ROMS for your locale (I’m not talking about the games) are very difficult to find. Once you have it up and running, playing NeoGeo software on-the-go has never been easier.
The GP2X is a cool gadget for many reasons (not just the ones I listed above). It’s a completely open platform, and that means possibilities for aspiring programmers who want to work their magic on a portable hardware platform. Sure, there are other portable devices, such as platforms which support Windows CE, and… umm… cell phones. The first choice is too expensive and the other is too boring. Who wants to write software for a cell phone as a hobby? There are far too many cell phones on the market to make that forray very interesting. Not to mention the fact that most cell phones were never designed to play games in the first place.
 This is a perfect game to play after a hard days work at the office. It’s perfect because the objective couldn’t be easier to remember: collect all of the white pellets in every level. Naturally, collecting these pellets isn’t as easy as collecting rocks. There are plenty of obstacles in your way like daring jumps, touchy explosives, attractive magnets, and small angry balls of fire. To further enhance your experience, each level is timed so you can’t allow yourself to be distracted by screaming kids, nagging spouses, or government taxes. On second thought, it may not be wise to ignore the second one.
If you’re one of the few skilled players who manage to complete the game – I finished it a couple of years ago (after years of “training”) – you can supplement your addiction with the Robot Factory. Only through the factory can your dreams of monolithic, white pellet construction be realized. Remember to save your construction and post it on the Internet; don’t forget to add a comment here telling us where we can find it.
I would recommend playing it on the Atari 800 XL. It has much more vibrant graphics than the Commodore 64 version and the sound is pretty much the same.
 The first Atari 8-bit computers to arrive on the scene in 1979 were codenamed Candy and Colleen, referring to the Atari 400 and 800 respectively. The latter was rumored to be named after an attractive female staff member (she undoubtedly had curly brown hair and lovely chocolate eyes, just like my wife). The Atari 400 was marketed as a gaming system, while its more expensive cousin was seen as a personal computer. The Atari 400 featured a membrance keyboard, which was eventually replaced by a proper keyboard starting with the Atari 800. Much of the “guts” for the 8-bit computer line came from Cyan, the engineering team responsible for the Atari 2600. In a couple of years, they produced three processors for the new computer models: CTIA, POKEY, and ANTIC.
CTIA is an acronyn for Color Television Interface Adapter and was the successor to the TIA chip used in the Atari 2600. It was reponsible for translating the information produced by the ANTIC chip into signals the television could understand. In later machines, Atari replaced the CTIA chip with the GTIA chip which had much more functionality. In addition to the DAC (digital-to-analog converter), the GTIA controls sprites, collision detection, priority control and color-luminance (brightness) to all objects including display lists from the ANTIC processor. Along with all that extra functionality, some GTIA versions made for the European market were buggy due to a PAL processing error.
The ANTIC processor was reponsible for interpreting display lists, which were instructions on how each scan line was to be displayed, line locations, interrupts, scrolling, and indicating where to find resources such as graphics or character sets.
POKEY was responsible for reading the keyboard, generating sound and serial communications. It also provided timers, a random number generator (for sound noise as well as random numbers), and maskable interrupts. POKEY has four semi-independent audio channels, each with its own noise, frequency and volume control. Each 8-bit channel had its own audio control register which selected the noise content and volume. For higher sound resolution, two of the audio channels can be combined for more accurate sound.
The XL versions contained simplified circuitry to help cut down costs and space requirements. The XL versions were also engineered to comply with the new FCC regulations at the time. One particularly interesting feature, called the PBI (Parallel Bus Interface), allowed for unprecedented access to the computer hardware by an outside peripheral. The PBI is a 50-pin port which provides an unbuffered, direct connection to the system bus lines (address, data, control) running at the same speed as the 6502 CPU. Only the 600XL and 800XL computers had such an interface. The XE systems of the day (65 XE, 130 XE, 800 XE, XEGS) came with the Enhanced Cartridge Interface (ECI), instead.
If you don’t have the space or simply do not want the original hardware in your home, there are a few good Atari emulators out there. Atari800Win is an excellent hardware emulator for Microsoft Windows, and is my preferred choice for this platform. Another great emualtor is the open-source project called atari800. Due to the nature of this opensource initiative, it will probably become the leader in Atari 8-bit emulation unless something goes wrong, which is not uncommon for such projects. Obviously the more people who fiddle with the timings and compatibility, the more a project will progress toward the overall goal of 100% compatibility. Whichever version you choose, both have the source code available in case neither supports your favourite platform. One such platform could be the Gamepark handheld device. atari800 was ported to the device some time ago in 2003-2004, but the author has since dropped the project.
If software development is more to your liking, then you may appreciate programs such as CC65. CC65 is a cross-compiler/assembler suite for a variety of destination platforms such as Atari 8-bit and Commodore 64. This cross-compiler will create binary files that are compatible with the desired microprocessor. Compilers are usually complex tools at the best of times, but don’t let that stop you! If you don’t want to program in assembly language, then CC65 will let you write your software using the “C” programming language. “C” is considered a higher level language by many people, but these people obviously haven’t dealt with nested pre-processor macros before. For the more hardcore amoung you, there is always the option of using a native Atari assembler to write your software. You may even be able to use BASIC – don’t underestimate its power! I’ve written several programs using BASIC and the results never fail to impress… myself.
Atari BASIC
September 11, 2007 My experience using BASIC is something I cannot easily put into words. I had never been exposed to programming before, so at first I had a hard time understanding the concept. I started out slowly, playing around with some simple commands which were described in various issues of ANTIC magazine.
Actually, my first experiments were much simpler, consisting of just a single command being given to the interpreter. I loved being able to control the color of my background or make a bunch of erratic and tuneless beeping sounds through our television speaker. For the first time, I was in control of the machine, even if all the machine did was squeak and change colors. I didn’t learn about how the interpreter used line numbers until my father picked up a copy of Atari BASIC by Albrecht, Finkel, and Brown. It was during my sessions with this book that I also learned about control flow statements, looping, data types, and loads of new commands. It still took me a while before I learned how to save my creations to disk, but it was too late to go back by then. The bait had already been taken, and it wasn’t long before my parent’s saw what was happening: I was hooked and I was going to need funding for my new hobby.
For the most part, I learned most of my Atari BASIC programming skills through my father’s subscription to ANTIC. This magazine was devoted to the Atari 400/800 series of computers which were popular in the early to mid-1980s. Another popular magazine at the time was A.N.A.L.O.G., but I didn’t have access to as many of them as I would have liked. I enjoyed the latter because it had much more diverse and complex programming examples and articles. When I got my hands on our first copy, I wasn’t even pausing to read most of the articles, I just brought it straight to the computer and began entering the source code in by hand. Sometimes the process took hours and my code was often marred by spelling mistakes and missing commands. I eventually learned these mistakes were called bugs by people in the software world. Tracing through these programs taught me a lot about programming and debugging. Mostly, it taught me to be careful while typing, and began to practice my typing skills using another software program designed for this purpose. To this day, however, I am mostly a 3:4 finger typist; three being the typical number of fingers I use for my left hand, and four being the perfect number for my right.
My father eventually purchased a dot-matrix printer for the system. It was a Star NX-1000 II, and I absolutely adored this printer. I quickly learned how to use it in BASIC and began printing reams upon reams of code. I enjoyed debugging and enhancing my programs using the printed form. It was an excellent way to get a handle on the whole problem, since the environment in the interpreter prevented you from seeing the whole picture easily. The font was just too large and the software did not have the ability to manually scroll the view. In fact, the concept of a window wouldn’t be realized on desktop computers until a few years later. In order to examine a block of code, you needed to continually LIST the sections in chunks or just dump the whole thing at once and wait for the area you were interested in to come into view. The continuously scrolling source code was slow enough you could track it with your eyes, and once you saw the region of code you wanted, pressing the break key would stop the process.
Another great feature of the Atari’s BASIC language was the ability to examine and modify specific bytes in memory. At the time, I don’t think I fully understood the concept of a memory address, at least not the way I understand it now. It was more abstract for me than other concepts. I knew that writing certain integer values into locations identified by other integer values allowed me to play music and control the colors of fonts and backgrounds, but I didn’t associate these number values to a physical address in the machine. In fact, I’m not sure I even truly understood what memory did, other than the typical high-level rationalization: if you buy more RAM it will allow your computer to play this game or use that piece of hardware. I generally understood memory to be a good thing. The more you had, the better off you were.
It wasn’t until I started programming the Commodore 64 (C64) with a friend of mine that I began to understand its function and organization. A big part of that understanding came from a device called the Super Snapshot cartridge which could plug into a port on the Commodore computer. This miraculous device had a number of cool features, and one of those features allowed the user to interrupt a game (or whatever) and examine/modify the contents of RAM and then return as if nothing had happened. Initially, we used this device to cheat on games by changing the number of lives, strength, loot, whatever. All we needed to do was isolate the byte responsible for tracking these attributes in memory, modify the contents of the variable at that address, and voila! We were invincible, we could crush any opponent, or we could buy any item. Life was good. I believe the manual for the Super Snapshot explained a number of details about memory and how it was organized. This served as a great stepping stone for my next foray into the world of Atari memory.
The next big advance for me came after reading the book: Mapping the Atari by Ian Chadwick. It explained what all of those numbers meant and how they were used by the Atari. I was enthralled and began to experiment with earnest. Incidently, the commands I was using to read and write values to and from memory were called PEEK and POKE respectively. Loads of fun can be had with these commands and that great little book. As it turns out, this book became even more useful while dabbling with assembly language years later on the Atari.
Atari 8-bit OS
September 10, 2007 Atari DOS – This operating system was the first operating system I was exposed to during my youth, and the 2.x series was the most popular in my household. The operating system was loaded off of 5 1/4″ double-sided double-density diskettes which usually offered about 320 KBs of storage space after formatting, although other disk formats offered less or more storage depending on density. The operating system did little more than manage disk functions such as formatting diskettes or erasing and copying files, hence the full name “Disk Operating System.” It could, however, be used to boot strap the cartridge or run a binary program at an arbitrary address after it was loaded. The DOS was mostly used to access files and programs stored on floppy diskette. It provided a File Management System (FMS) which needed to remain in memory in order to provide disk access functionality to other programs.
Believe it or not, there are still hardware/software hobbyists and professionals creating products to use with your Atari. I have a software solution called A.P.E. which allows me to use my computer as a virtual disk drive, printer, modem, etc. It’s absolutely fantastic and accelerates software loading to a fraction of the time it took before. There are also products which allow you to connect a hard drive through the cartridge port, or even USB devices!
 A.P.E. stands for Atari Peripheral Emulator and is an essential piece of software for any Atari user. Until a few years ago, I was forced to play my Atari games via an emulator or on the Real McCoy using the terribly slow, but wonderfully nostalgic floppy disk drive. I don’t think it’s necessary to mention how painful it was waiting for the disk operating system to load, and then waiting for the actual game to load, and then waiting for the game to save, and then waiting for the game to load the second disk… you get the idea. There was a lot of waiting, and somehow I mangaged to do it without batting an eye lash in 1984.
First and foremost, A.P.E.’s biggest strength comes in the form of its disk drive emulation software. In order to get it to work, you must own a working Atari computer. The author probably explains exactly which Atari computers are compatible somewhere on his website, but I can tell you for sure that the Atari 800 XL and Atari 400 computers work like a charm. Simply connect your Atari computer to your personal computer using a custom SIO interface cable. The cable can be purchased through the web site, or you can even make your own if you’re so inclined. Install the APE software on a computer, configure it, select a disk image, and boot up your Atari machine. Voila! The software you selected will boot in record time. Plus, your personal computer now acts as a virtual hard drive for your Atari! You can put away those floppy diskettes, all of your games and applications can be saved and archived as an “ATR” file, which A.P.E. can understand.


